Podcast: Play in new window | Download | Embed
I have a thing about ‘rubbish’. I guess I have a thing about a lot of things that don’t really makes sense in our modern lives, but let’s not get started on all that.
A presenter at the recent Auckland Home Show summed it up well when she said that no organic material should ever really leave your property. It’s a bit of stretch to take that to the full extreme right now, but the essence is there.
Organic material, especially food scraps, is just not waste and should never be treated as such. Yet we do. Because it’s easy, cheap and socially acceptable.
Compost is nature’s way of recycling and it’s truly awesome. When you get into the details, there’s all sort of funky chemistry and biology going on in a well performing compost heap. But one of the coolest things about composting is that you don’t need to know any of that stuff. Like many of the best things that happen naturally, it happens, well, naturally!
There are a few things you can do to help it along the way and to ensure we keep the ‘socially acceptable’ bit. This mainly involves keeping the smell down and rodents away. And providing you get that right, you’ll also be able to score more social points by sharing with your neighbours an abundance of fresh, organic produce all year round!
Steps for Making Good Compost at Home
So what do you need for good composting?
 1. Ice cream!
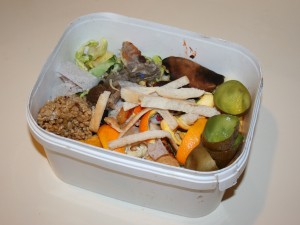
Buy a big tub (preferably three litres, but two will do it). Enjoy the ice cream and keep the container and the lid for collecting food scraps in the kitchen. In our place we actually have two containers which helps for a rotation. Plus, you get to eat more ice cream.
2. Big Black Plastic Bin
Okay, so it doesn’t have to be black and it doesn’t have to be plastic. But this is most common.
After collecting food scraps inside, the big black plastic bin outside is the first stage of composting. The bin needs a lid to keep flies and smells at bay. The lid also prevents the mix from getting too wet or too dry.
Our ice cream containers get emptied at least once a day into the black bin outside.
Into the bin should go all your kitchen scraps (and I mean, all of them), layered with some stuff from the garden, like leaves, grass clippings weeding etc. This really helps prevent any smells because it’s important to mix different types of materials. Without getting too complicated, you basically need a good mix of carbon (woody bits) and nitrogen (green bits and food). Also, larger woody bits like twigs and garden clippings help keep the heap aerated. Compost needs oxygen for aerobic decomposition.
For a small garden and a small family, one plastic bin should suffice. Once it’s full, empty it out into a heap and mix with more garden clippings. In our case we have two black bins. One took 6 months to fill and we’ll leave it maturing for 6 months while we fill the other one.
3. A heap
I’m quite proud of my heaps. I built them one weekend using fence palings and it all looks a bit ‘farmy’. But the compost heaps that I grew up to love at my parent’s place were cobbled together with any old bits of iron and wood that Dad could find.
The general purpose of the heaps is to store a big pile without it spreading everywhere. It is handy to be able to get in there every so often with a fork to turn it over, so have a front that comes apart to some extent can be handy.
Generally compost should stay in the heap for six to twelve months. But this depends a bit on climate, how regularly you turn it over and the mix of nitrogen, carbon and moisture content. If it gets too dry, it could benefit from some waste water from the washing up being thrown on it every now and then. If it’s getting too wet, try turning it, adding some dry material like wood chips and consider covering it to keep the rain off.
And that’s it!
A worm farm can also be a handy addition, and fun for the kids. Especially the boys in our experience.
Leave a Reply